

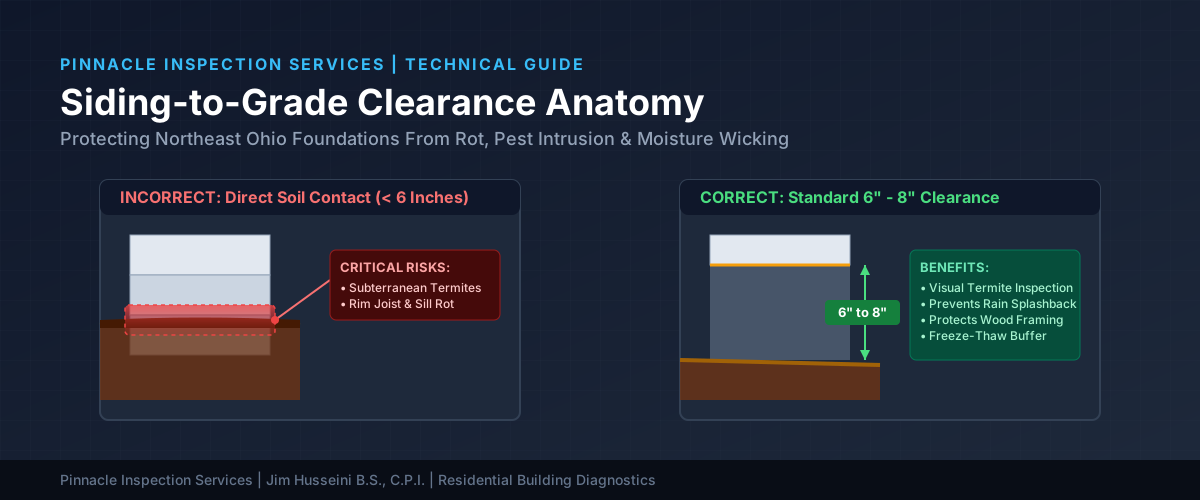
As a Certified Professional Inspector (C.P.I.) evaluating homes across Northeast Ohio—from historic homes in Cleveland Heights to new developments in Medina and Akron—I consistently flag one critical exterior defect: improper clearance between exterior siding and the surrounding grade. Homeowners spend tens of thousands of dollars on high-end vinyl, fiber cement, or wood siding, only to have landscaping crew members, home additions, or years of garden bed layering push earth directly against the lower rim of the house wall envelope. This single construction oversight triggers catastrophic rot, concealed pest damage, and severe water entry.
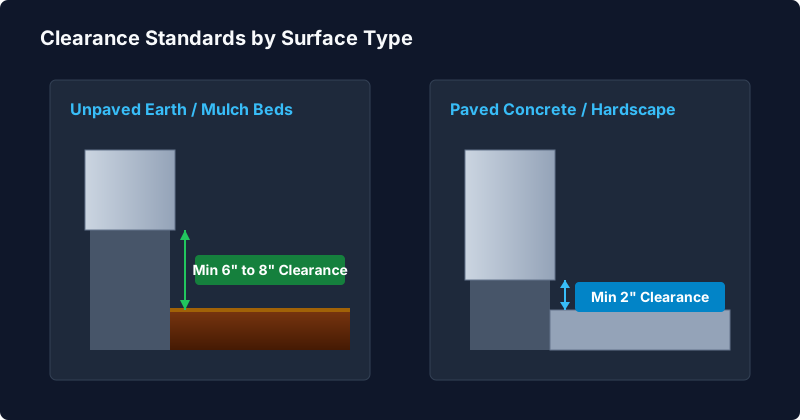
- The 6-to-8-Inch Soil Rule: Unpaved soil or garden beds must maintain a minimum distance of 6 to 8 inches below the bottom edge of siding.
- The 2-Inch Hardscape Standard: Paved surfaces like concrete walkways, driveways, or patios require a minimum clearance of 2 inches from exterior cladding.
- Hidden Structural Rot: Direct ground contact allows moisture to wick upward into the wooden sill plate and rim joists, destroying the structural integrity of your floor framing.
- Termite Highway: Underground pests bypass exposed concrete foundations entirely, entering walls unnoticed beneath low-hanging siding.
- Northeast Ohio Climate Risks: Freeze-thaw cycles, deep snow drifts, and heavy clay soil amplify moisture damage when clearance is compromised.
Understanding Siding-to-Grade Clearance Requirements
The primary purpose of your home’s exterior cladding is to shed water away from the structural framing. Siding is designed as a rain screen, not an underground waterproofing membrane. Building codes, including the International Residential Code (IRC Section R404.1.6) and modern siding manufacturers’ installation requirements, strictly dictate how much foundation wall must remain exposed between the ground and the start of your siding.
When siding extends too close to the ground, capillary action draws groundwater upward into the building materials. Over time, this leads to structural deterioration, paint failure, mold contamination, and pest infestations that remain invisible until major repairs become necessary.
Building Code Standards vs. Manufacturer Specifications
The standard baseline clearance distance mandated by building codes across the United States is 6 inches minimum above bare soil. However, many exterior cladding manufacturers—including major vinyl siding brands like CertainTeed and James Hardie fiber cement products—require a full 8 inches of ground clearance to maintain warranty coverage.
When siding abuts flat concrete surfaces (such as driveways, poured patios, or masonry steps), the code requirement shifts to 2 inches minimum clearance. Because hard surfaces shed water quickly and do not hold organic moisture like soil or wood mulch, a smaller clearance gap is acceptable. However, failure to maintain even this 2-inch gap allows splashing rainwater to bounce directly up into the bottom channel of the siding, causing rot along the base framing.
Why Ground Clearance is Critical in Northeast Ohio
Homes in Cleveland, Akron, Canton, and surrounding areas face environmental stressors that quickly exploit inadequate building envelope clearances. Our heavy clay soils, intense summer downpours, freeze-thaw winter dynamics, and prolonged snow accumulation make proper siding clearance mandatory for preserving home structural integrity.
Moisture Wicking and Structural Rot
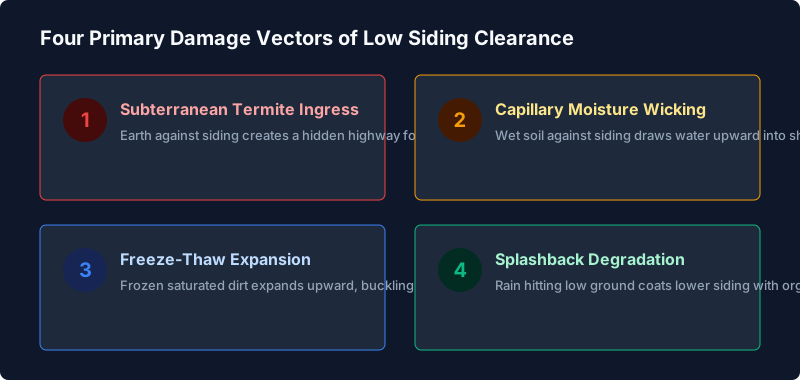
When soil or wood mulch touches siding, moisture migrates into wall assemblies through capillary action. Siding is designed to allow air circulation beneath the lower starter strip. If that opening is blocked by dirt, trapped ambient humidity cannot escape. Moisture saturates the bottom wall sheathing (OSB or plywood) and rots out the horizontal wood sill plate that anchors your home to its foundation.
Repairing rotted sill plates and rim joists requires jacking up exterior wall structures, supporting the home temporarily, and replacing entire sections of structural wood. These repairs can easily cost between $5,000 and $20,000—all preventable by maintaining a simple 6-to-8-inch soil clearance gap.
Concealed Termite Access Corridors
Subterranean termites require continuous moisture and build mud tubes from the earth up to structural framing. A clean, exposed foundation wall (6 to 8 inches of concrete) forces termites to build visible mud tubes over the foundation face where inspectors and homeowners can easily spot them during routine maintenance checks.
When soil rises above the foundation wall to contact the bottom edge of vinyl or wood siding, termites bypass the visual concrete barrier completely. They tunnel directly into wall cavities behind siding panels without leaving any visible exterior warning signs until structural timber failures occur.
Northeast Ohio Freeze-Thaw Dynamics
In Northeast Ohio, heavy clay soil retains significant amounts of moisture. When temperatures drop below freezing, saturated soil expands vertically and laterally. Soil pushed up against low-hanging siding puts direct upward force on vinyl starter strips, buckling bottom wall panels, opening structural joints, and allowing snowmelt to penetrate wall cavities during winter thaw cycles.
Step-by-Step: How to Inspect Your Home’s Siding Clearance
Performing a thorough home perimeter check takes about fifteen minutes and requires only basic hand tools. Follow this step-by-step procedure to evaluate your property’s ground clearance safety margin.

Step 1: Locate the Concrete-to-Siding Boundary
Walk the full perimeter of your foundation. Locate where the solid masonry foundation (poured concrete or concrete block) meets the lower edge of your exterior siding, trim boards, or brick veneer ties.
Step 2: Measure True Earth Height
Place a stiff tape measure directly against the exposed vertical face of the foundation wall. Measure vertically from the top of the dirt down to the bottom lap edge of the lowest siding panel. If wood mulch, bark, or gravel is present, push it aside down to the compacted mineral soil. **Decorative mulch counts as soil height** because mulch absorbs water and holds high ambient humidity against siding components.
Step 3: Inspect Transitions and Raised Surfaces
Pay close attention to perimeter zones where exterior structures were added after original construction:
- Poured concrete patio slabs and paver walkways
- Front porch steps and stoops
- Raised garden beds built directly along foundation walls
- High soil mounds near air conditioning condenser pads
Common Deficiencies Discovered During Home Inspections
During routine pre-purchase and pre-listing home inspections across Cuyahoga, Summit, and Portage counties, home inspectors frequently observe improper siding clearance conditions. The most common causes include:
1. “Mulch Volcanoes” and Garden Bed Layering
Over years of maintenance, homeowners add new layers of organic wood mulch annually without removing old decayed layers. This landscaping practice creates “mulch volcanoes” that raise ground level several inches above original foundation design lines, burying lower siding panels.
2. Retrofitted Concrete Patios and Paver Walkways
When installing new paver patios or concrete walkways, installers sometimes pour concrete right up to bottom siding courses without excavating enough sub-base material. This reduces clearance to zero inches, trapping rainwater against exterior walls during storm events.
3. Grade Creep from Drainage Alterations
Homeowners often pile topsoil against foundation walls to eliminate back-pitch slope issues without realizing they are creating a new problem. Fixing ground pitch by burying siding trades foundation water intrusion for structural rim joist rot.
How to Fix Poor Siding-to-Grade Clearance
If your inspection reveals that your siding sits too close to surrounding grade levels, take corrective actions promptly to mitigate long-term structural risk.
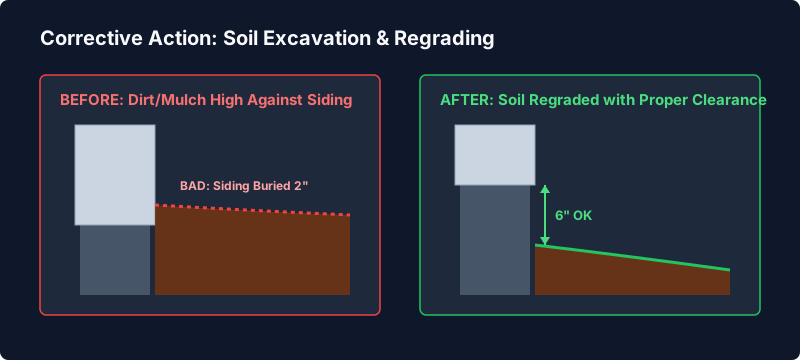
1. Regrade Landscaping and Excavate Excess Soil
The most straightforward solution is removing excess soil and old mulch beds along your home’s perimeter. Excavate soil down to expose 6 to 8 inches of foundation wall. When digging back soil, maintain a positive slope away from your foundation wall (6 inches of drop over the first 10 feet of lawn distance) so water does not pool in excavated perimeter trenches.
2. Install Window Wells or Masonry Retaining Walls
If overall yard topography prevents lowering perimeter grade levels across an entire wall length, construct dedicated masonry retaining walls or install galvanized steel window wells (or foundation wells) to hold back earth from contacting foundation walls and low siding strips.
3. Trim Siding and Install Bottom Z-Flashing
When concrete walkways or patios cannot be lowered, hire a professional contractor to trim bottom siding panels upward to establish a 2-inch clearance line above concrete. Ensure contractors install proper corrosion-resistant metal Z-flashing along the bottom edge of trimmed wall sheathing to protect structural wall framing from water splashback.
What is the minimum clearance required for vinyl siding above garden soil?
Building codes require a minimum of 6 inches of clearance between vinyl siding and unpaved soil or garden beds. However, most vinyl siding manufacturers recommend establishing an 8-inch clearance gap to protect siding materials from moisture wicking and maintain valid warranty coverage.
Can I place a plastic moisture barrier against my siding instead of lowering high dirt levels?
No. Placing plastic sheeting or rubber membranes against low siding panels traps moisture within wall cavities, accelerating wood rot and mold development behind exterior walls. The only effective long-term repair is establishing proper visual clearance between ground levels and siding lower edges.
How does snow accumulation in Northeast Ohio affect siding clearance recommendations?
Deep snow drift build-up during Cleveland winters places moisture against exterior wall envelopes. Maintaining a clean 6-to-8-inch concrete clearance zone prevents ground snowmelt from wicking directly into floor framing sill plates during winter freeze-thaw cycles.
Protect Your Home Investment with Pinnacle Inspection Services
Understanding exterior moisture control, structural framing integrity, and grading performance requires extensive field expertise and thorough building system knowledge. Whether purchasing a home, evaluating exterior wall conditions, or checking your current property’s overall structural safety, professional home inspections provide real peace of mind.
At Pinnacle Inspection Services, owner Jim Husseini B.S., C.P.I. delivers comprehensive, visually detailed home inspections across Northeast Ohio. Contact Pinnacle Inspection Services today to schedule your comprehensive residential property assessment.